Rune Switch Puzzles are a collectible-style activity in Tiny Tina's Wonderlands that tasks players with finding a three-piece obelisk device in a region. Once activated, this contraption will teleport three runic pillars to distinct locations within the nearby vicinity. A ticking countdown will begin, compelling adventurers to quickly find all three of the obelisk checkpoints before the timer runs out. If players run out of time in Tiny Tina's Wonderlands, the puzzle will reset, forcing them to start over.
The Rune Switches are activated via a sequence, meaning that players must interact with the glowing pillars in order. Adventurers can recognize which Rune they are to go to next by its bright viridescent glow and the green beam of light it emits into the sky. Accordingly, these Rune Switch Puzzles can be thought of more as parkour challenges than puzzles that must be solved. Once the challenge has been completed, Tiny Tina's Newbies will receive a pool of valuable rewards, including currency and weapons.
Naturally, finding all the Rune Switch locations in Tiny Tina's Wonderlands will count towards the game's 100% completion. However, those who successfully finish all of the platforming challenges will also receive a permanent 10% increase in their character's Dexterity.
Tiny Tina's Wonderlands: Rune Switch 1 In Queen's Gate

The first Rune Switch in Tiny Tina's Wonderlands can be found in Queen's Gate within the village outside the castle. The device is on the rooftop of a watermill, accessed by climbing atop other buildings nearby and leaping over to the Rune Switch's location. Since this is the first parkour challenge in the game, players should have little trouble reaching the first two rooftop pillars and the third one atop a crumbled stone wall in the north.
Tiny Tina's Wonderlands: Rune Switch 2 In Brighthoof

The next Rune Switch is located in Brighthoof, the hub area of Tiny Tina's world. Players can find the obelisk device atop Izzy's Fizzies, the main tavern of the town. Head into the pub and ascend the stairways to the balcony with the Rune Switch. The glowing pillars will spawn in a circular-shaped route near Izzy's Fizzies in Brighthoof. Adventurers can find the first one directly on the left and use a jump pad to reach the second on a tower in the south. The third can be obtained by winding back around to face the tavern from the right.
Tiny Tina's Wonderlands: Rune Switch 3 In Mount Craw

The third Rune Switch location is the northern goblin village of Mount Craw's mines. Again, tiny Tina's Newbies will need to climb up to the upper level to find the activation device. The first runic pillar is located near a hut to the south. The second is on the ground level across the southwestern bridge, and the third is atop a wooden platform in the east, accessible by jumping on a nearby hut.
Tiny Tina's Wonderlands: Rune Switch 4 In Weepwild Dankness

Once adventurers reach the Weepwild Dankness region, they can find the fourth Rune Switch Puzzle in an enemy encampment on the western side of the map. The first and third obelisk collectibles in Tiny Tina's Wonderlands will spawn in plain sight on the upper wooden decks, but the second is relatively hidden on the left side of the camp. Players must use a bouncy mushroom near some wooden scaffolding as a jump pad to reach it.
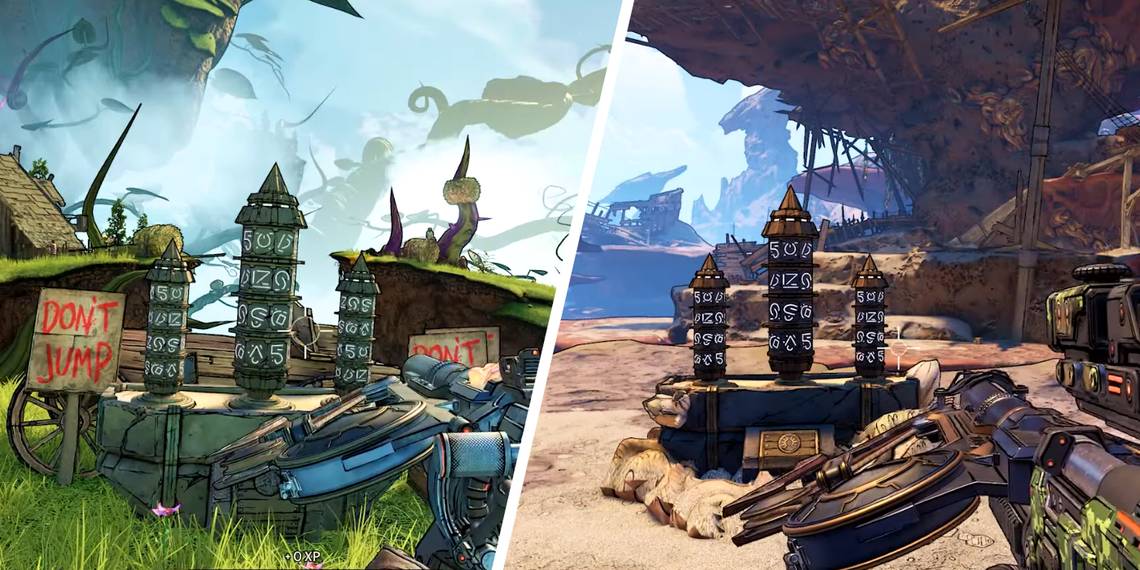
Tiny Tina's Wonderlands: Rune Switch 5 In Tangledrift

The fifth Rune Switch is located near the central sky islands of the Tangledrift zone. Adventurers will find the switch device sitting between two "Don't Jump" signs. The first Rune can be found atop a small ridge in the southeast, accessible by climbing up a nearby hay bale. The second is on a curly vine in the west, and the third pillar is near an underground portal beneath the hamlet's well.
Tiny Tina's Wonderlands: Rune Switch 6 In Wargtooth Shallows

For Wargtooth Shallows Rune Switch Puzzle, the obelisks spawn moderately far away from the activation device, which may confuse some players. The device is located in the area west of the map's center. After triggering the countdown mechanism in Tiny Tina's Wonderlands, use the jump pad on the right to glide over to the rocky island in the distance. Follow the path to find the first obelisk and turn left to discover the second behind a wooden wall with a hole. The third can be found nearby on some wooden planks that form a path to the upper level.
Tiny Tina's Wonderlands: Rune Switch 7 In Drowned Abyss

The seventh Rune Switch is close to the Merchant Vending Machines near the center of the map. The first and second pillars are straightforward to reach, but the third is located within the interior hull of a shipwreck. Shoot the giant anchor above the broken boat to smash open a hole to get inside.
Tiny Tina's Wonderlands: Rune Switch 8 In Crackmast Cove

The Rune Switch Puzzle in Crackmast Cove can be quite challenging to complete. Starting from the switch near the village made from ship parts in Tiny Tina's Wonderlands, rush to the large building in the east. The first green obelisk is hidden on a wooden platform behind the structure on the second floor. Be careful of the air-blasting vents before jumping across the platforms. The second Rune is on a rooftop directly east of the first, and the third is down in the gully lagoon past the bare ship frame on the right.
Tiny Tina's Wonderlands: Rune Switch 9 In Karnock's Wall

The ninth Rune Switch can be found on the lower levels of the northern zone in Karnock's Wall. The obelisk activator will be sitting on a small altar between two braziers. Players can easily find the first and second pillars along the winding trail to the north. However, the third is on a crystal-chain platform accessed by shooting the crystal right beside it.
Tiny Tina's Wonderlands: Rune Switch 10 In Sunfang Oasis

Sunfang Oasis's Rune Switch Puzzle is located in the region's southern section atop a wooden platform on a ridge. Adventurers must jump down to the gutter-like passage below to reach the first green pillar in the west. Then, slide down the wooden canal on the right to find the second, and use the jump pad on the ground to get to the third.
Tiny Tina's Wonderlands: Rune Switch 11 In Ossu-Gol Necropolis

The eleventh Rune Switch Puzzle sits atop a roof facing the large gate in the southern half of Ossu-Gol Necropolis. Thanks to the gloomy, purplish skies, the green beams from the obelisks are easy to see across the environment. Yet, the first pillar might be tricky to find as it's located beneath a ruined building west of the switch.
Tiny Tina's Wonderlands: Rune Switch 12 In The Fearamind

The twelfth and final Rune Switch is in the Fearamind map in Tiny Tina's Wonderlands, located near the center of the map by the giant conduit-like contraption. Despite being a late-game area, the Runes are moderately easy to find compared to other regions. Like the puzzle in Brighthoof, players can find all the obelisks in a circular fashion, starting with one directly to the south of the switch device. The next two are located nearby but can be somewhat tricky to see due to the bright mint-colored lights within the vicinity.
Tiny Tina's Wonderlands is available for Xbox One, Xbox Series X|S, PlayStation 4, PlayStation 5, and PC.