Spotify's ever-growing library of tracks makes it the perfect tool for aspiring music DJs to use at an event, and its Crossfade tool is an added bonus. Whether a user is showcasing their playlist-making chops at a private house party or is tasked with providing background beats at a public venue, Spotify has a few features that make every soundtrack mix seamless and well-balanced.
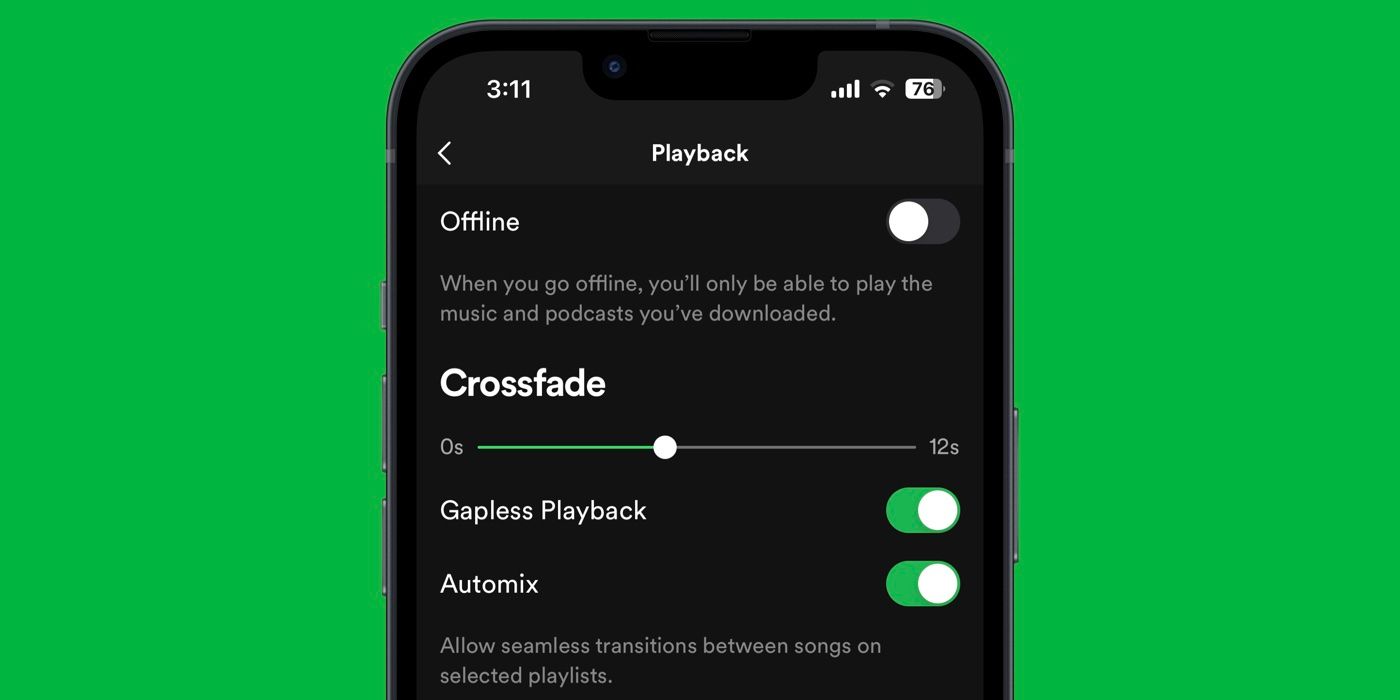
Spotify lets users crossfade tracks or eliminate the silence between songs so that the music never stops. To begin, launch the Spotify app and tap the home button. Hit Settings (gear icon), then pick 'Playback.' Under 'Crossfade,' drag the slider to the desired overlap length. This will make a Spotify playlist sound like one continuous track. To enable the feature on Spotify Desktop, click the dropdown arrow next to the Spotify username in the top-right corner of the screen and open Settings. Scroll down to 'Playback,' switch the 'Crossfade songs' toggle on, and drag the slider to the desired length. To preview the effect, play any song on a playlist and drag the time slider close to the end of the track to hear the crossfade. Go back to settings and increase the track overlap if a greater effect is desired.
What Is The Best Crossfade Time For Spotify?
Spotify lets users adjust the crossfade duration between 1 and 12 seconds. Having a blanket setting might not work for all playlists, and users might have to adjust the crossfade time occasionally. If the crossfade length is set to 12 seconds, the next song will automatically start playing when there are 12 seconds left in the current song, and users are more likely to notice the tracks transitioning. For most playlists, 12 seconds may be too long, but this length can come in useful when DJing at parties, since many songs only begin a few seconds in, and the longer crossfade time lets the audience get hyped for the next track.
If listening to music on a personal device, a crossfade time of 5 to 6 seconds is ideal. Anything shorter than that doesn't really allow time for the two songs to merge. Ultimately though, the ideal crossfade time comes down to a user's personal preferences. Playing around with different times, ranging from 2 seconds to 12, will give users a good idea of what works best for them.
Enable Automix To Merge Songs On Spotify
Another useful feature Spotify offers is Gapless Playback. Instead of crossfading songs so they mix into each other when they end, enable 'Gapless' under 'Playback' in Settings to remove the pause between tracks without the blended transition. Automix is another special feature that can be applied on exclusive Spotify playlists, not only crossfading songs, but also skipping intros or outros, adding effects, and even looping song segments to make the transition more seamless. Available under the same 'Playback' menu, turn on the toggle next to 'Automix' to enable the feature.
There are other important Spotify settings that can be useful for DJs. These settings — including the crossfade feature — cannot be changed or accessed while using Spotify Connect to play music on another device, so make sure that Spotify is active on only one device to continue. One such setting is the Equalizer, which lets users adjust the levels of bass and treble in any track on Spotify.
On an iPhone, launch Spotify, tap the home button and open Settings. Tap 'Playback,' choose 'Equalizer,' then switch the 'Equalizer' toggle on to enable the feature. Users can choose from the many presets provided or manually drag the dots on the equalizer to find their desired sound. Spotify Android users can launch the app, tap the home button, then hit Settings. Under 'Music Quality,' tap 'Equalizer' and choose the preferred sound in the device's audio settings. Spotify's Equalizer feature may not be available on all Android devices and equalizer changes applied may also affect the sound quality of other apps.
Use Audio Normalization To Balance Volume
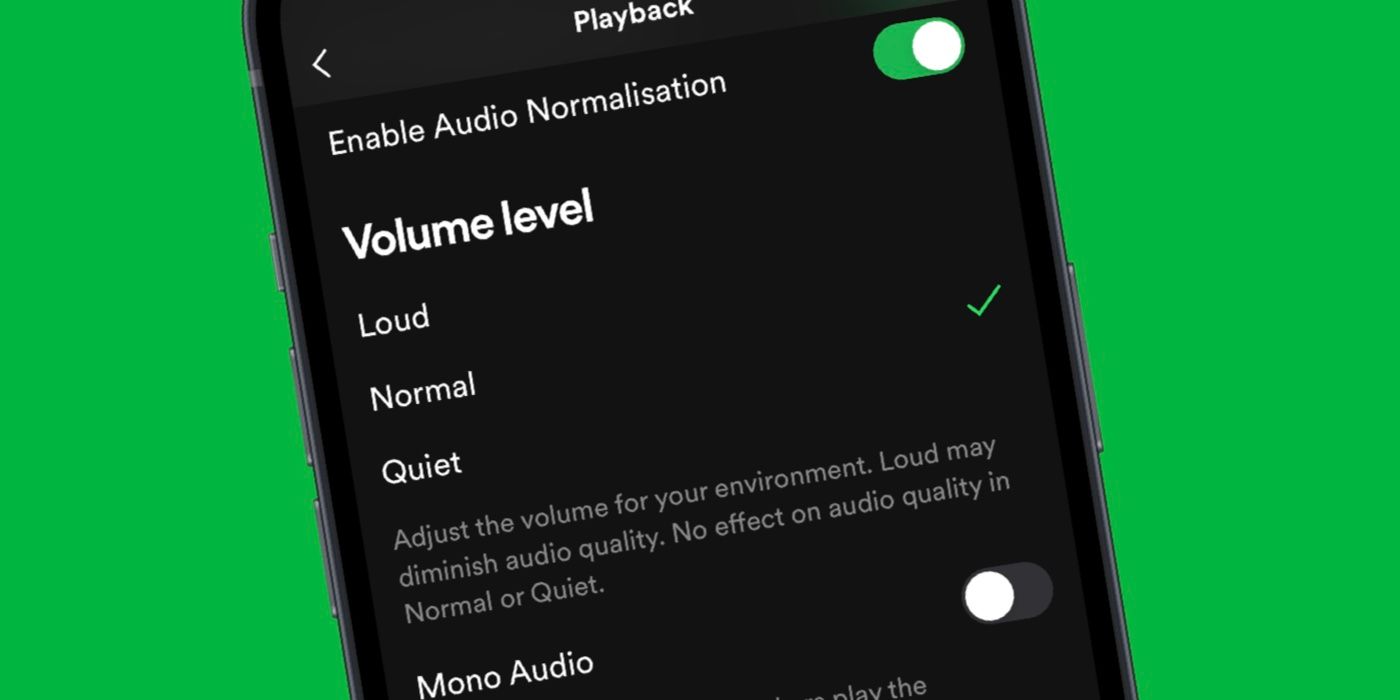
Spotify Premium subscribers will have access to the app's built-in audio normalization feature that can easily balance soft and loud songs for a more leveled sound trip. Launch the Spotify app, open Settings, then pick 'Playback.' Switch the 'Enable Audio Normalization' toggle on to access volume options, which can be adjusted according to a level appropriate for any environment.
If using Spotify Desktop, click the dropdown arrow next to the Spotify username and pick Settings. Under 'Audio Quality,' switch on 'Normalize volume' so that all songs have the same volume level. Pick one of the three available volume level presets. 'Loud' is great for noisier environments, but this option may diminish the audio quality and offer less dynamic levels. 'Normal' is the default setting, while 'Quiet' is great for quieter settings. Again, these changes cannot be made while using Spotify Connect to play on another device.
Source: Spotify


