Owners of Sony's PlayStation 5 console can now expand the system's solid state drive storage. The hardware has supported storage expansion since launch, but it wasn't until the recent PS5 system software update that the extra SSD slot could be used. The process is a little more involved than that for increasing the Xbox Series S and X storage, but Sony's approach to the matter allows consumers to use non-proprietary SSDs, which many may find to be the superior (and cheaper) option. Still, before PS5 owners pull off one of the console's faceplates, what follows is a quick rundown of what the process involves.
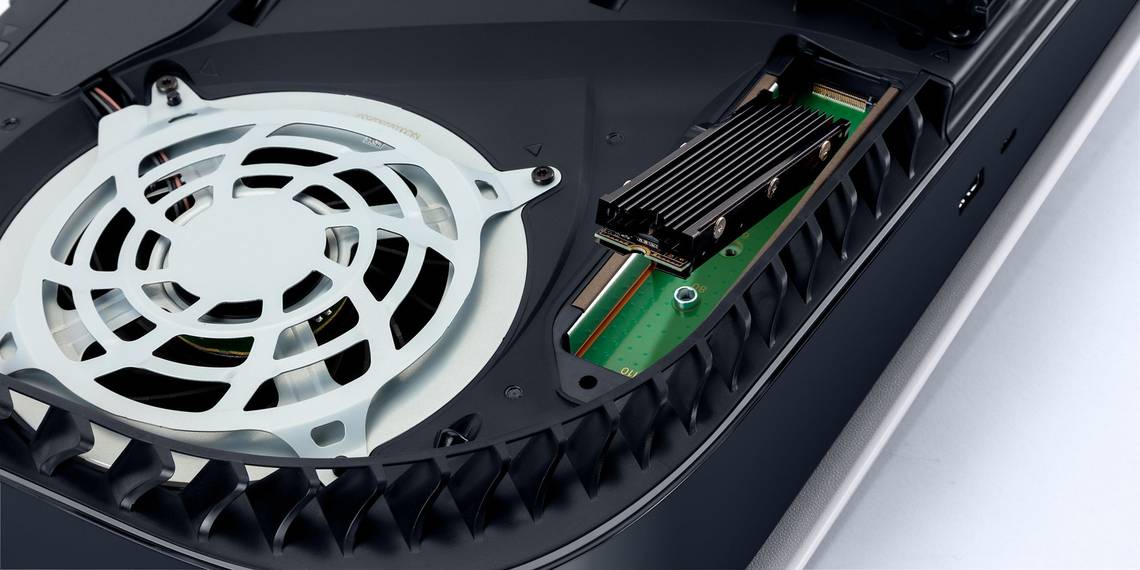
First, those looking to expand their PlayStation 5's memory capabilities will have to find a compatible M.2 SSD. The "M.2" simply refers to the SSD's form factor, and denotes the specific kind of SSD the PS5 is designed to use in its internal expansion slot. External storage devices have worked with the PS5 since day one, but PS5-specific games had to be loaded onto the system's internal SSD storage in order to work. There are plenty of M.2 SSDs on the market that will be compatible with the PS5, but it should be noted that Sony recommends one with a built-in heatsink. Consumers should also be aware that the internal memory expansion slot only supports SSDs with capacities between 250 Gigabytes and 4 Terabytes.
There are more SSD specifications delineated on the PlayStation support page, but Screen Rant has also compiled a list of PS5-compatible SSD options. To install the secondary SSD, users will need to open up their PS5s and access the expansion slot, which only requires a #1 (for miniature screws) Phillips head screwdriver. The faceplate which does not have the PlayStation logo on it will have to be removed after the console is completely shut down, before the expansion slot cover can be removed by taking out a single screw. Exact steps to installing the SSD can be found at the above PlayStation link as well, or via the video below. The experience will differ slightly based on the physical size of SSD purchased.
Formatting & Putting Games On The New PS5 M.2 SSD
Click here to watch the above video on YouTube.
The process for putting the PS5 back together is just a matter of reversing the steps. Once the SSD has been secured in its slot, the cover can be screwed back into place, and the PS5's faceplate put back on. Once the console is plugged back in and powered on, the system should walk users through the formatting process. After the new SSD has finished formatting, it should appear in the system settings, under the storage page, right next to the console's built-in SSD.
From the system's settings, games already installed on the console can be moved to the new SSD. Just like the built-in storage, the freshly installed SSD will be able to play both PS4 and PS5 games, as well as store other files like screenshots and recorded videos. Going to the "Installation Location" page in the storage settings will also let users decide where games downloaded from the PlayStation Store go by default. If the PlayStation 5 storage is already full, the new M.2 SSD can be selected as the preferred location, and the console will store games there until the setting is otherwise changed.
Source: PlayStation (2)